How to Draw Hello Kitty: Easy Step-by-Step Drawing Tutorial for Kids
Hello Kitty is one of the most beloved cartoon characters in the world, and for good reason! Created by the Japanese company Sanrio in 1974, this adorable little white cat with her signature bow has captured the hearts of millions of children and adults alike. Drawing Hello Kitty is a fantastic art project for kids because her design is intentionally simple, making her the perfect subject for young artists who are just learning to draw.
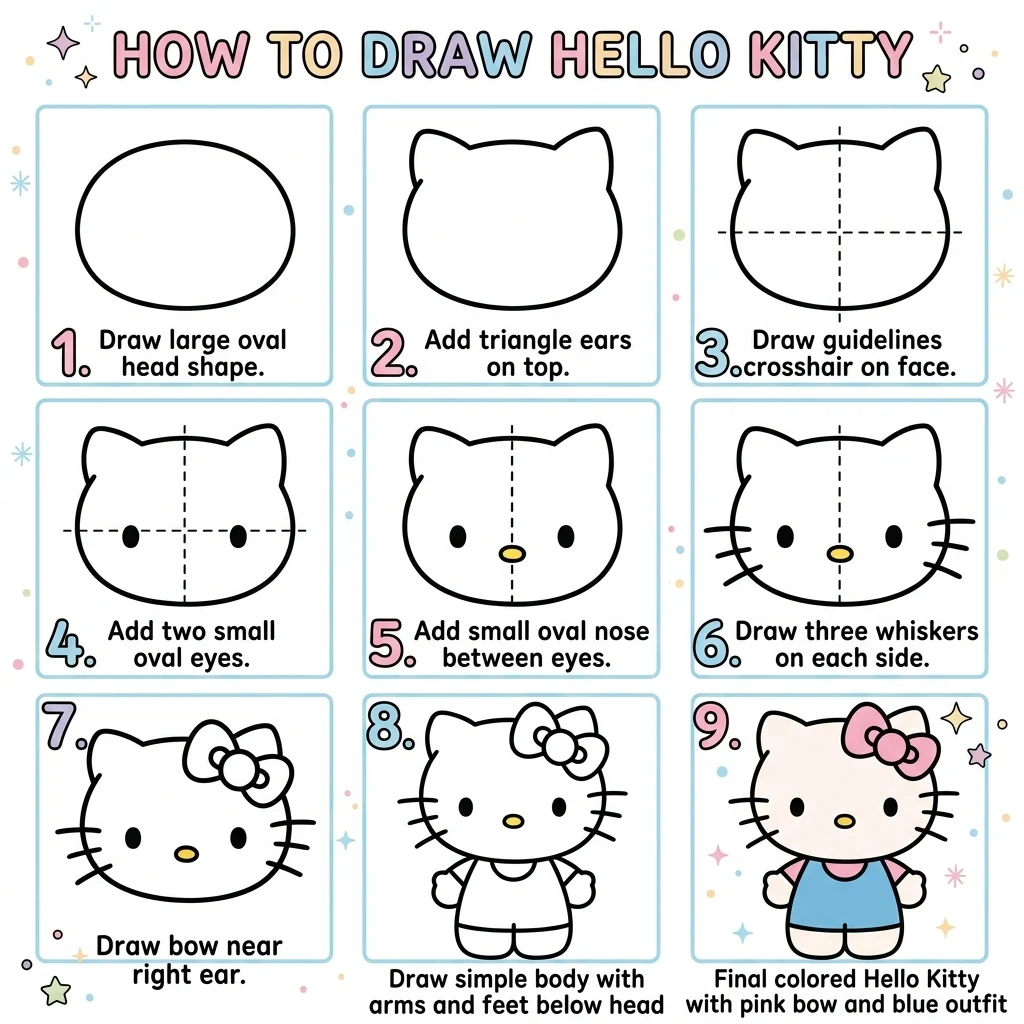
In this comprehensive step-by-step tutorial, we’ll show you exactly how to draw Hello Kitty from start to finish. Whether your child is a complete beginner who has never picked up a pencil for drawing, or a young artist looking for a fun new challenge, this guide breaks the entire process down into 9 easy-to-follow steps. Each step builds on the previous one, so by the time you reach the end, you’ll have a beautiful, complete Hello Kitty drawing that you can be proud of!
What makes Hello Kitty such a wonderful drawing subject for kids is that she’s made entirely from basic geometric shapes — ovals, triangles, circles, and simple lines. There’s no complex anatomy or tricky perspective to worry about. This means kids as young as 4 or 5 years old can successfully follow along and create their own version of this iconic character. So grab your pencils and let’s get started!
Materials You’ll Need
Before you begin drawing, make sure you have all your materials ready. Using a light pencil (HB grade is perfect) allows you to sketch lightly and erase easily if you need to make adjustments. Once you’re happy with your pencil drawing, you can trace over it with a black marker to make the lines bold and clean — just like the real Hello Kitty!
Step-by-Step Hello Kitty Drawing Tutorial
Follow each step carefully. Remember, there’s no rush! Take your time with each step and don’t worry if your lines aren’t perfect. The beauty of drawing is that you can always erase and try again. Let’s begin!
Start by drawing a large, slightly flattened oval in the center of your paper. This oval should be wider than it is tall — think of a squished circle or the shape of an egg lying on its side. This is going to be Hello Kitty’s head, which is the most important part of the entire drawing since it takes up most of the character!
Make sure to leave some space at the top of the paper for the ears (which we’ll add next) and some space at the bottom for the body. Position the oval slightly above center on your page. Keep your pencil strokes light at this stage — you may need to adjust the size or shape later, and light lines are much easier to erase.
Pro tip: If you’re having trouble drawing a smooth oval, try rotating your paper and drawing the shape in the direction that feels most natural to your hand. Some kids find it easier to draw ovals by making small, circular motions first and then connecting them into a single shape.
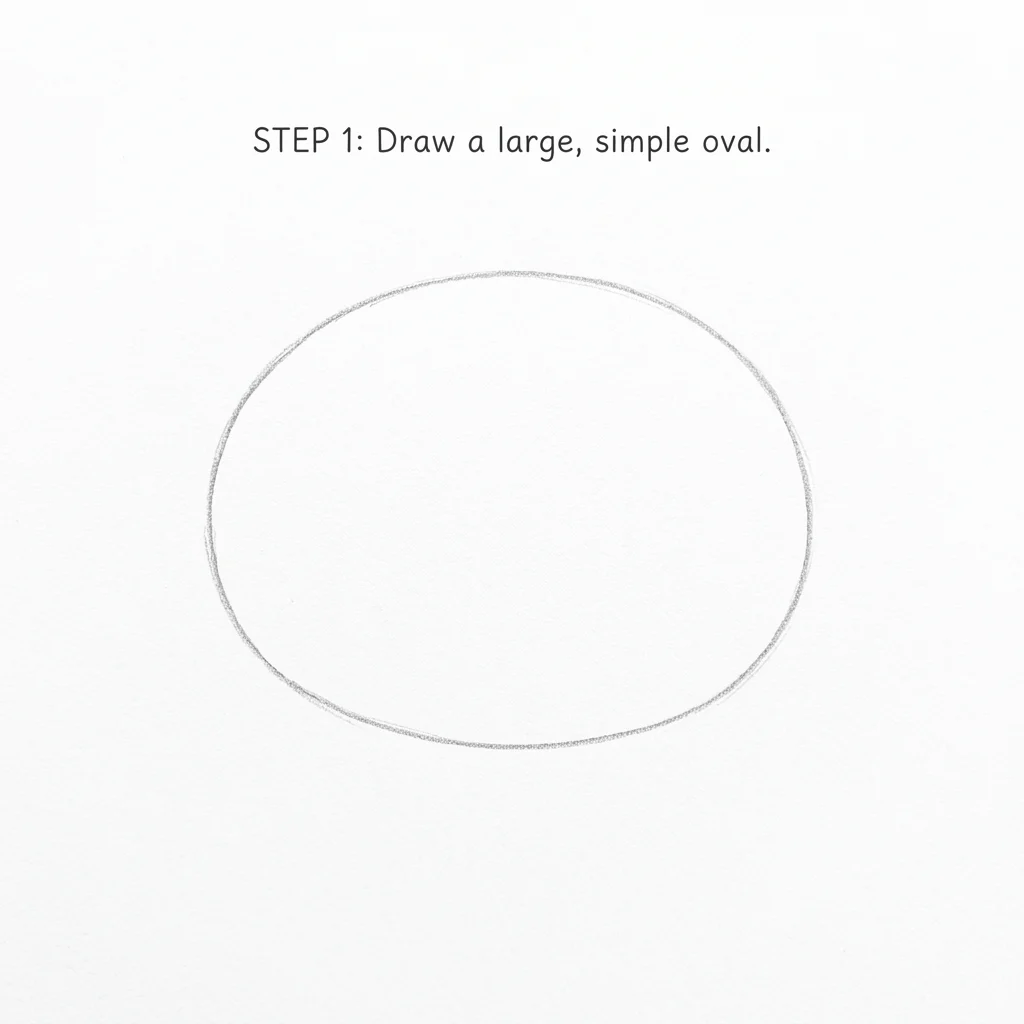
Step 1: Draw the Head Shape
Now it’s time to give Hello Kitty her adorable cat ears! Draw two small triangles on top of the head shape — one on the left side and one on the right side. The triangles should point upward and be roughly the same size. Each ear should be about one-fifth the width of the head.
Position the ears so they sit naturally on the top curve of the oval. They shouldn’t be too far apart (that would look like horns!) or too close together (that would look like one big ear). A good rule of thumb is to place each ear about a quarter of the way in from each side of the head.
Make sure both ears are symmetrical — the same size and the same angle. If one looks bigger than the other, don’t worry! Just erase it and try again. Symmetry is a key part of drawing Hello Kitty, and getting the ears right sets the foundation for the rest of the face.
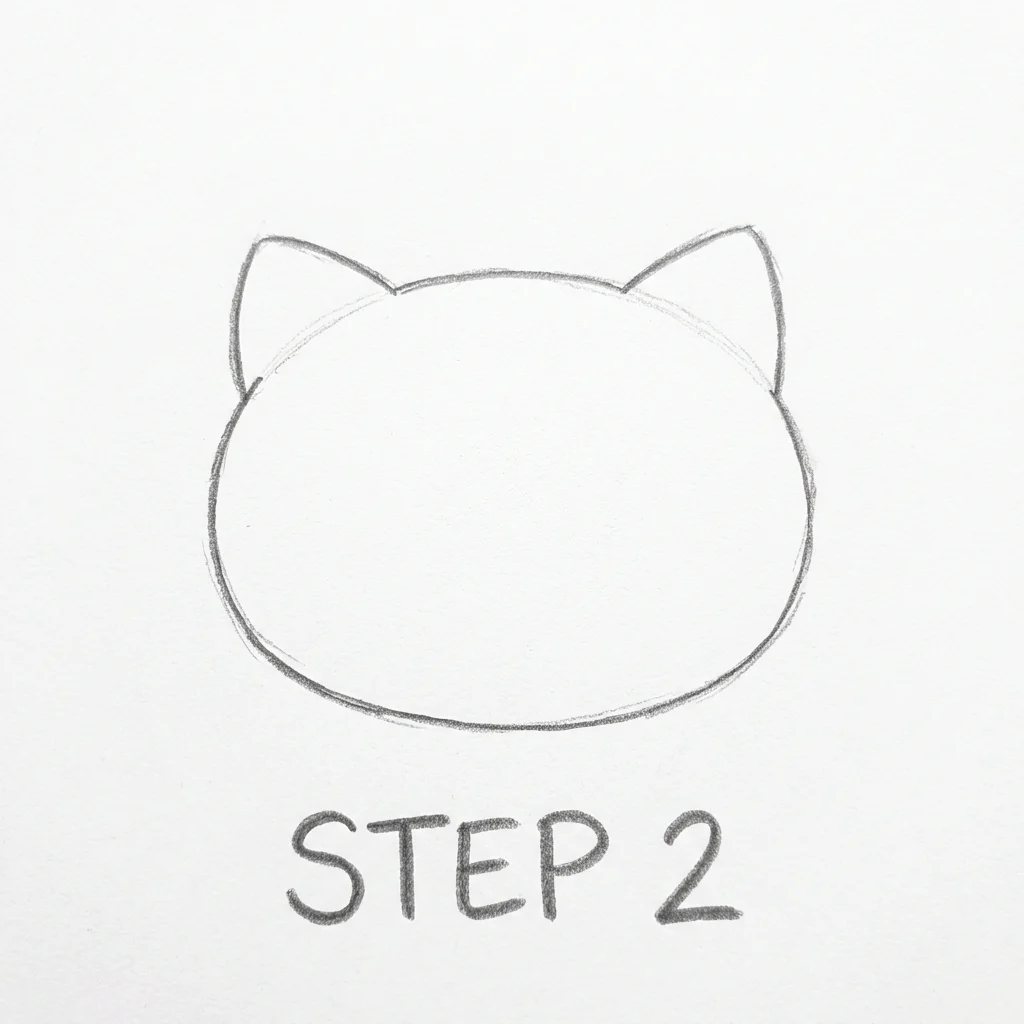
Step 2: Add the Ears
This is a super helpful step that many professional artists use! Lightly draw a horizontal line and a vertical line crossing in the center of the head oval. These are called “guidelines” or “construction lines,” and they’ll help you place Hello Kitty’s facial features in exactly the right spots.
The vertical line should divide the face in half from top to bottom, and the horizontal line should sit slightly below the center of the oval. The eyes will go on this horizontal line, and the nose will go right where the two lines cross. Draw these lines very lightly because you’ll erase them later!
Using guidelines is one of the most important drawing techniques you can learn. Even professional cartoonists and animators use them to make sure their characters’ faces look balanced and proportional. This simple trick will dramatically improve the quality of your drawing!
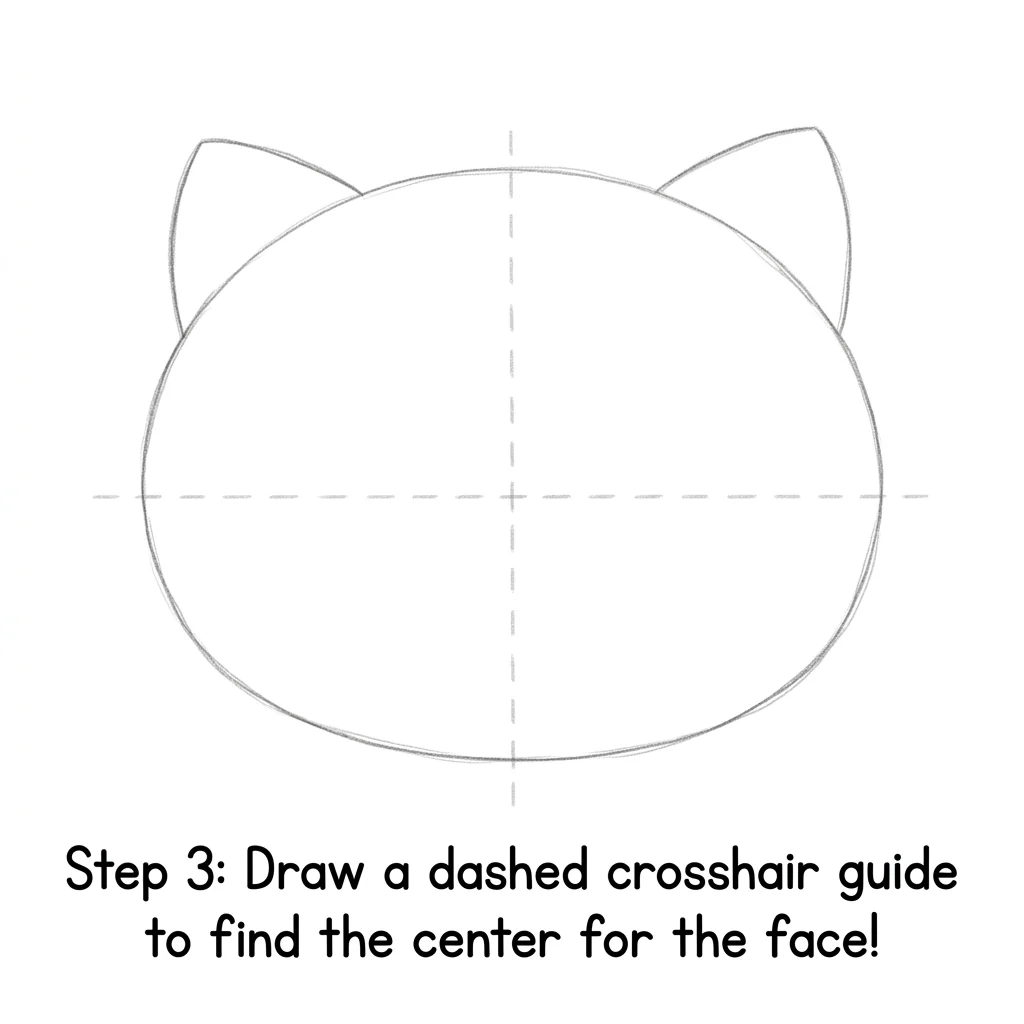
Step 3: Draw Face Guidelines
Hello Kitty’s eyes are one of her most recognizable features — and they’re super easy to draw! Place two small, solid black ovals on the horizontal guideline you drew in the previous step. Each eye should be on opposite sides of the vertical guideline, equally spaced from the center.
The eyes should be fairly close together but with enough space between them for the nose. A good spacing rule is to leave about one eye-width of space between the two eyes. Make them small relative to the head — Hello Kitty’s eyes are tiny dots compared to her big round head, and that’s part of what makes her look so cute!
Fill in the ovals completely with your pencil or marker to make them solid black. Unlike many cartoon characters, Hello Kitty’s eyes don’t have visible pupils or white highlights — they’re just simple, solid black shapes. This simplicity is a big part of her charm!
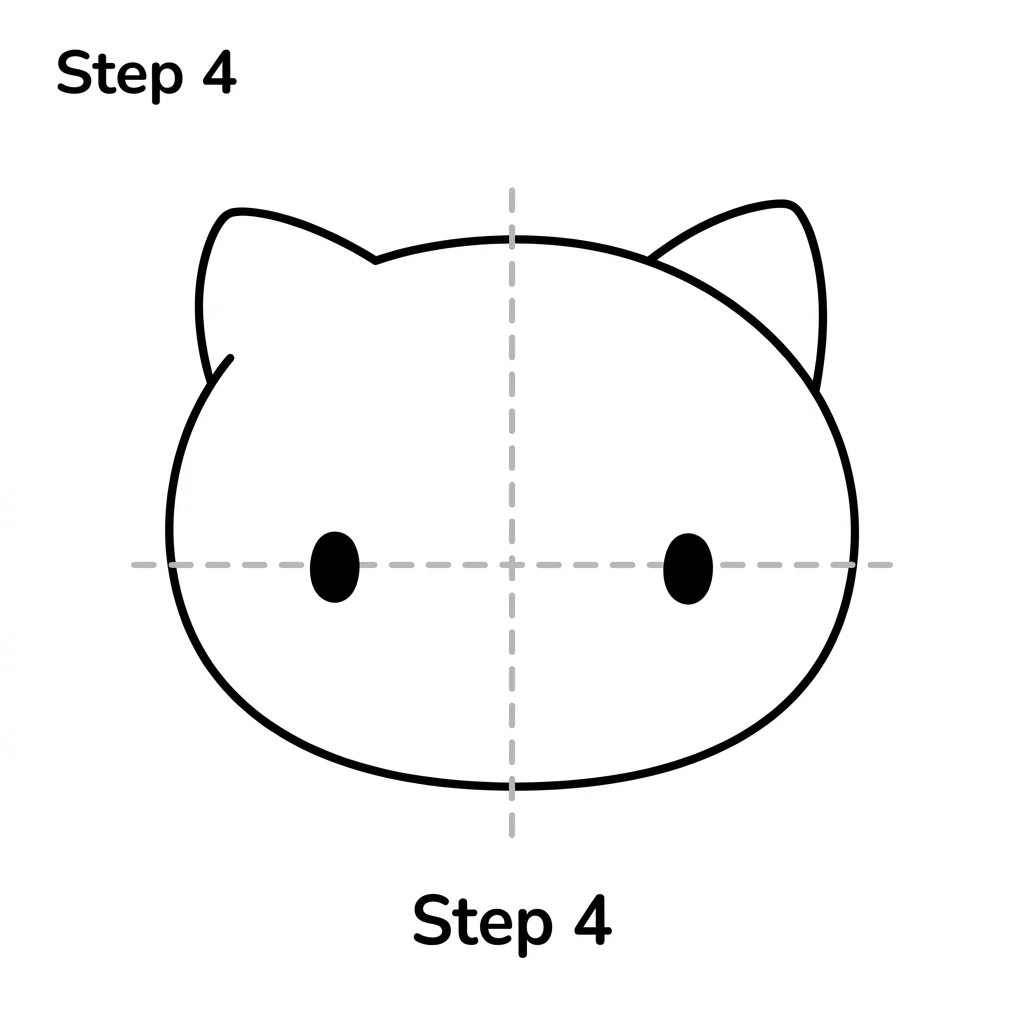
Step 4: Draw the Eyes
If you’re having trouble keeping the eyes even, try this trick: measure the distance from the vertical guideline to each eye using your pencil or finger. Both distances should be the same! You can also hold your drawing up to a mirror — any asymmetry will be much more obvious in the reflection. Remember, guidelines are your best friend when drawing faces!
Hello Kitty’s nose is a tiny, adorable detail that sits right in the center of her face. Draw a small, horizontal oval right where your two guidelines cross — that’s the exact center of the face. The nose should be slightly below the eyes, and it should be even smaller than the eyes.
In most Hello Kitty illustrations, the nose is colored yellow, which makes it stand out against her white face. For now, just draw the outline of the oval. You can color it in later during the coloring step. The nose is one of the few colored features on Hello Kitty’s face, so it’s an important detail to get right!
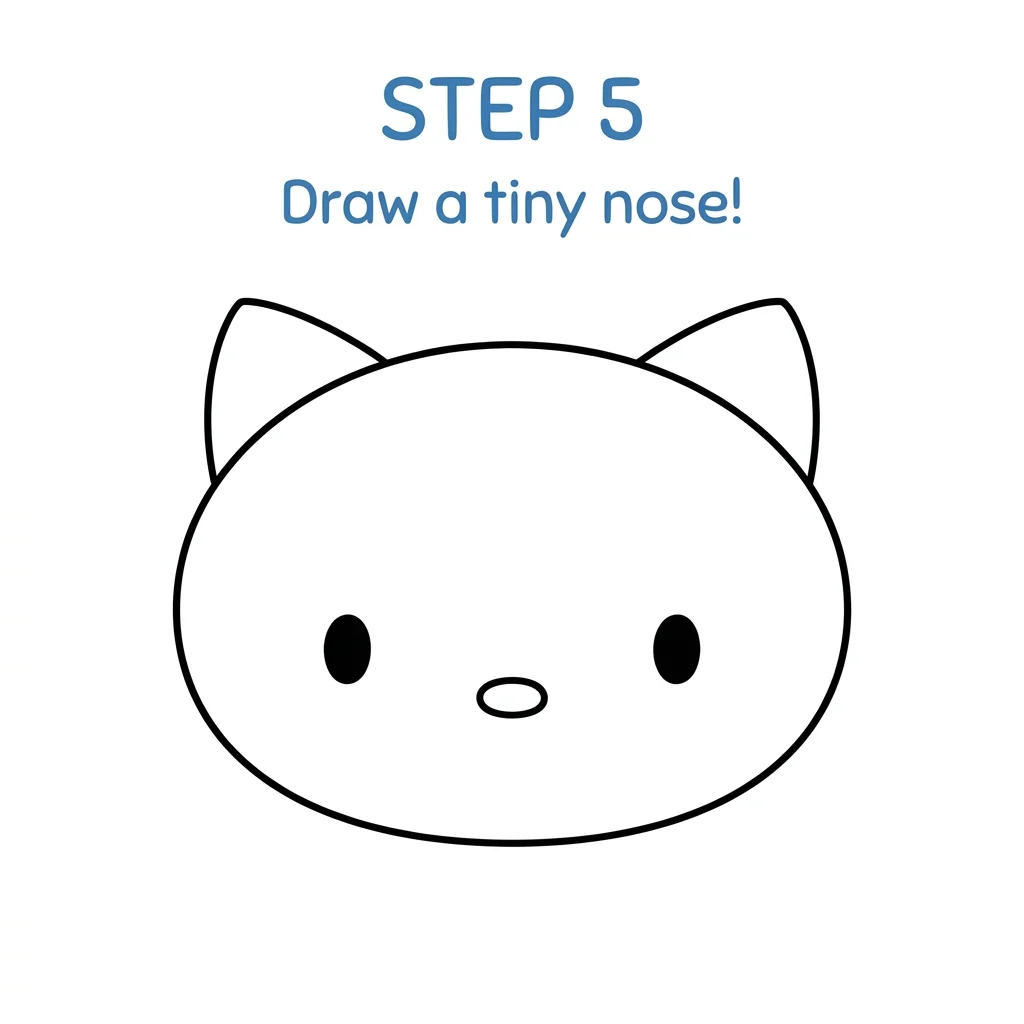
Step 5: Add the Nose
Now for one of Hello Kitty’s most iconic features — her whiskers! Draw three short, straight horizontal lines extending outward from each side of her face. The whiskers should start from the cheek area (roughly level with the nose) and extend outward toward the edges of the head.
Keep the whiskers evenly spaced — one above the nose level, one at nose level, and one below. All six whiskers (three on each side) should be roughly the same length. They don’t need to be perfectly straight; a slight natural curve can look charming too!
Fun fact: In the original Hello Kitty design, she actually doesn’t have a mouth! The creator, Yuko Shimizu, intentionally left the mouth off so that children could project their own feelings onto Hello Kitty — she can be happy, sad, or excited depending on how you’re feeling. So don’t add a mouth unless you want to create your own unique version!
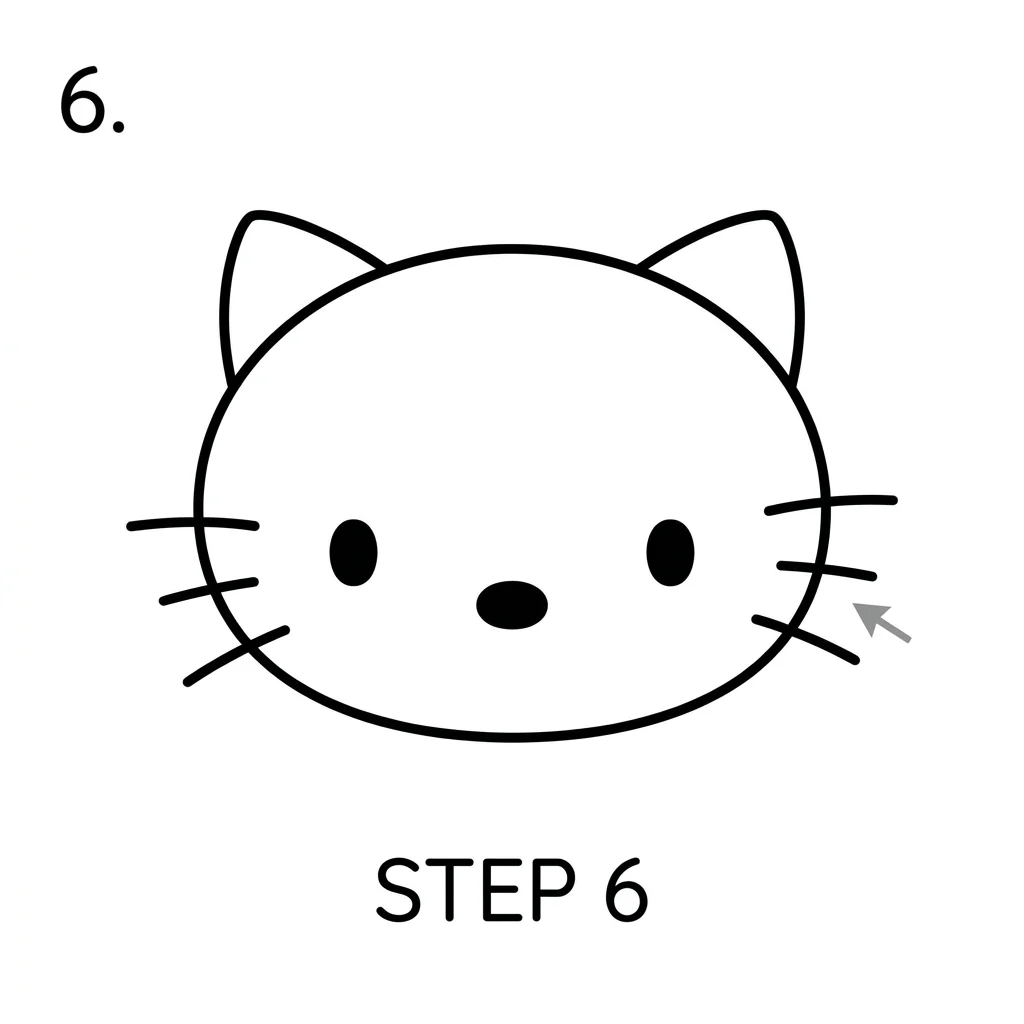
Step 6: Draw the Whiskers
No Hello Kitty drawing is complete without her signature bow! The bow is typically placed near her right ear (which would be on the left side of your drawing as you look at it). Start by drawing a small circle for the center of the bow, right next to the ear.
Next, draw two rounded petal shapes (like butterfly wings) on either side of the center circle. Each petal should be about the same size as one of her ears. The petals can be rounded triangles or more oval shapes — experiment to see what style you like best!
The bow is what truly identifies Hello Kitty, so take your time with it. You can make it big and dramatic or small and cute — it’s up to you! In the classic design, the bow is red with a white outline, but you’re free to color it any color you like. Some artists even add polka dots, stripes, or stars to the bow for extra flair!
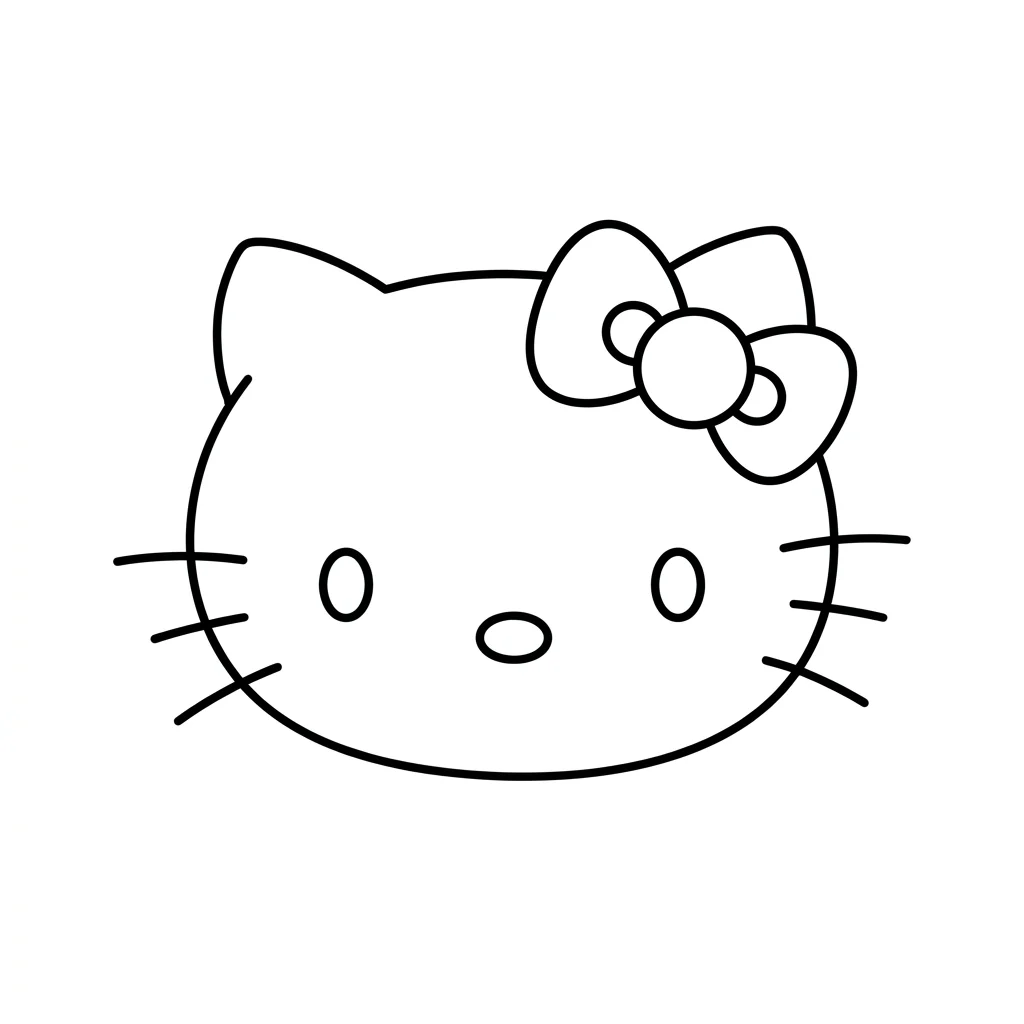
Step 7: Add the Bow
Now let’s give Hello Kitty a body! Below the head, draw a small gumdrop or pear shape. The body should be noticeably smaller than the head — in the Hello Kitty universe, the head is always the dominant feature. The body connects directly to the bottom of the head without a visible neck.
Add two small, rounded arms extending from the sides of the body. They can be simple curved lines or stubby oval shapes. Then add two tiny feet at the bottom — just two small ovals or rounded rectangles side by side.
Hello Kitty’s body is often shown wearing a cute outfit — a dress, overalls, or a jumpsuit. You can draw a simple line across the body to indicate a shirt hem, or add a small collar detail near where the head meets the body. Keep it simple and don’t overthink the body proportions — the focus should always be on that adorable face!
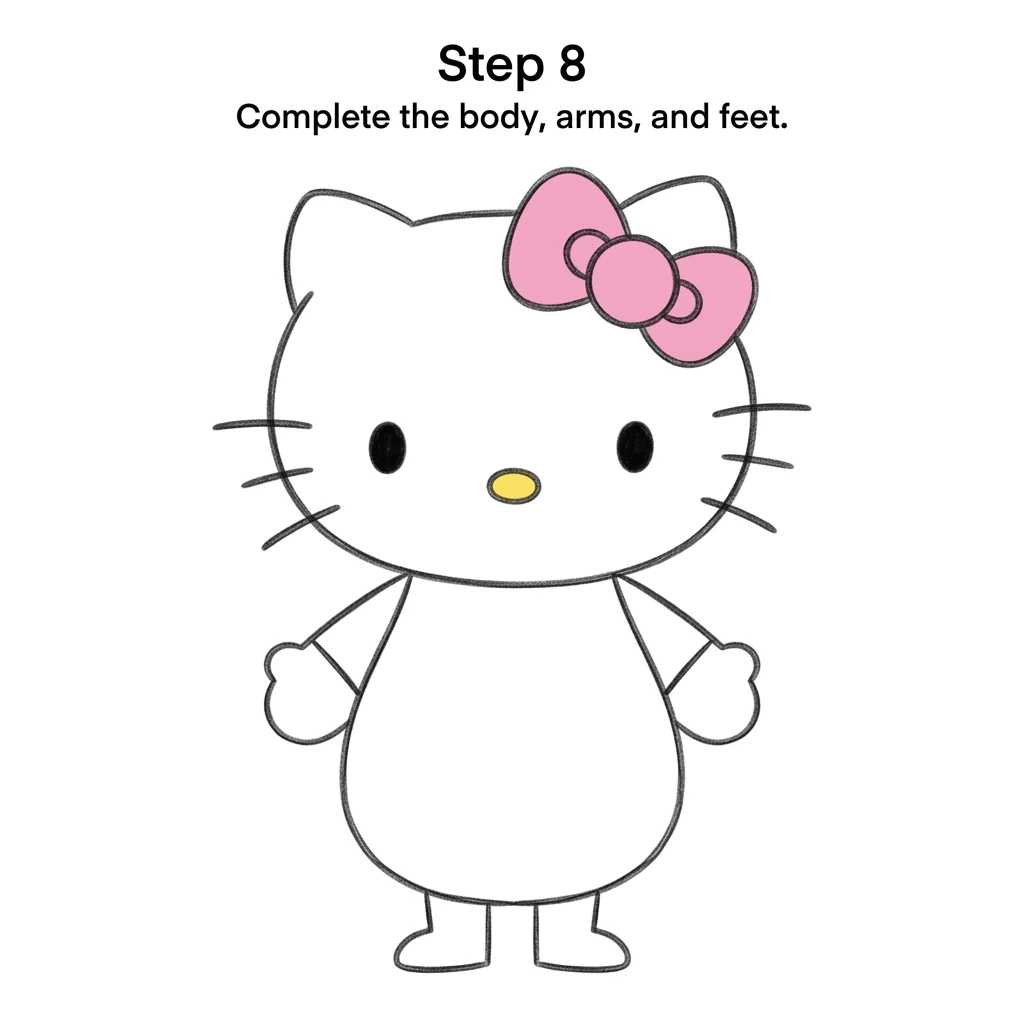
Step 8: Draw the Body
The final step is the most fun — coloring! First, carefully go over all your pencil lines with a black marker to make them bold and clean. Make sure the marker is dry before you erase any pencil lines or guidelines underneath.
Now erase all those light construction lines and guidelines. Then it’s time to add color! Here’s the classic Hello Kitty color scheme: keep the face and body white (just leave the paper blank), color the bow red or pink, color the nose yellow, and choose a fun color for her outfit — blue, pink, purple, or any color you love!
For extra polish, you can add a subtle light pink blush to her cheeks using a colored pencil or pastel. You can also add a background — perhaps some flowers, stars, hearts, or even a rainbow behind your Hello Kitty. This is your artwork, so make it uniquely yours!
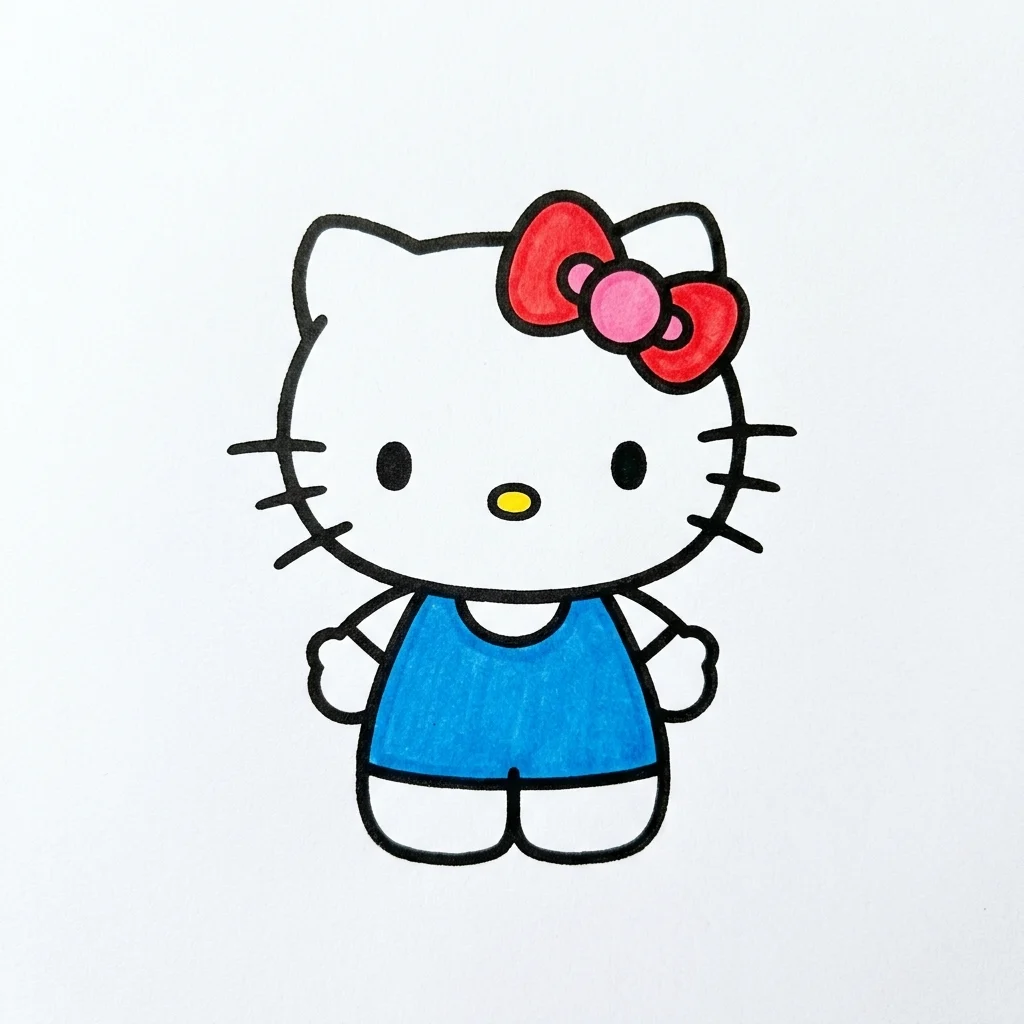
Step 9: Color Your Hello Kitty
Tips and Tricks for Drawing Hello Kitty
Here are some expert tips that will help you create the best Hello Kitty drawing possible:
- Start light: Always begin with light pencil strokes. You can darken your lines later, but it’s much harder to erase dark pencil marks. Think of your first sketch as a rough draft that you’ll refine.
- Use references: Keep a picture of Hello Kitty nearby while you draw. Looking at the official design helps you get the proportions and details right. You can find reference images in books, online, or even on Hello Kitty merchandise!
- Focus on symmetry: Hello Kitty’s face is perfectly symmetrical (except for the bow). Use your guidelines and take your time to make sure both sides of the face match. Hold your drawing up to a mirror to spot any unevenness.
- Keep shapes simple: The magic of Hello Kitty is in her simplicity. Resist the urge to add too many details. The cleaner and simpler your shapes, the more she’ll look like the real character.
- Practice makes perfect: Don’t be discouraged if your first attempt isn’t perfect! Every artist started somewhere. Try drawing Hello Kitty several times — you’ll notice improvement with each attempt.
Fun Variations to Try
Once you’ve mastered the basic Hello Kitty drawing, here are some creative variations you can try:
- Seasonal Hello Kitty: Draw her wearing a Santa hat for Christmas, holding a pumpkin for Halloween, or wearing bunny ears for Easter! Seasonal themes make your drawings extra special and fun to give as gifts.
- Different Outfits: Design unique outfits for Hello Kitty — a princess dress, a superhero cape, a chef’s hat, or even a sports uniform. Let your imagination run wild!
- Hello Kitty and Friends: Draw Hello Kitty alongside other Sanrio characters like My Melody, Cinnamoroll, or Keroppi. Or create your own original friends for her!
- Giant Hello Kitty: Try drawing a super-large Hello Kitty head that fills the entire page, then add intricate patterns and decorations inside the outline for a zentangle-style artwork.
- Emoji Hello Kitty: Give Hello Kitty different expressions by adding small mouths — a smile, a surprised “O”, or heart-shaped eyes. Even though the official character doesn’t have a mouth, adding one can be a fun creative exercise!
Benefits of Drawing for Kids
Drawing isn’t just fun — it’s also incredibly beneficial for children’s development. When kids follow a step-by-step drawing tutorial like this one, they’re exercising their fine motor skills, which are the same muscles they use for writing. The precise movements required to draw lines, shapes, and details help strengthen hand-eye coordination and pencil control.
Art activities also boost creativity and self-expression. When your child chooses the colors for Hello Kitty’s bow or decides to add a unique background, they’re making creative decisions and expressing their personality. This builds confidence and encourages them to think outside the box in other areas of life too.
Furthermore, completing a drawing from start to finish teaches patience, focus, and perseverance. Following a 9-step tutorial requires concentration and the ability to follow sequential instructions — skills that are valuable in school and beyond. And the sense of accomplishment when they hold up their finished Hello Kitty drawing? Priceless!
Explore More Drawing Tutorials
If you enjoyed learning how to draw Hello Kitty, we have plenty more fun tutorials waiting for you! Check out our Monkey Drawing tutorial to create an adorable cartoon monkey with a curly tail. Sports fans will love our Soccer Ball Drawing guide where you’ll master the classic pentagon pattern. For more animal fun, hop over to our Frog Drawing tutorial or try our super-cute Bunny Drawing guide — perfect for Easter or any day of the year!
❓ People Also Ask
The easiest way to draw Hello Kitty is to break her down into simple shapes. Start with a big flattened oval for the head, add two small triangle ears on top, then place two tiny solid oval eyes, a small oval nose in the center, and three whisker lines on each side. Add her bow near one ear and draw a small pear-shaped body below. Using light guidelines (a cross shape on the face) helps keep everything symmetrical and perfectly positioned!
Hello Kitty is made entirely from basic geometric shapes that kids already know! You’ll use a large oval for the head, small triangles for the ears, tiny ovals for the eyes and nose, straight lines for the whiskers, a circle and petal shapes for the bow, and a pear or gumdrop shape for the body. This makes Hello Kitty one of the easiest characters to draw for beginners.
To draw Hello Kitty’s bow, start with a small circle near her right ear for the center knot. Then draw two rounded petal shapes (like butterfly wings) on either side of the circle. The petals should be about the same size as one of her ears. Color the bow red or pink — or any color you like! You can even add patterns like polka dots or stripes to make it extra special.
For the classic Hello Kitty look, you’ll need: black for the outlines and eyes, red or pink for the bow, yellow for the nose, and your choice of color for the outfit (blue is the most classic). The face and body are left white. However, you’re free to get creative with any colors you love — there’s no wrong way to color your Hello Kitty!
Yes, absolutely! Hello Kitty is one of the best characters for young children to draw because she’s made entirely of simple shapes like ovals, triangles, and lines. With a step-by-step guide and a bit of patience, kids as young as 4-5 can create a recognizable Hello Kitty drawing. The key is to take it one step at a time and not worry about perfection — every child’s version will be unique and wonderful!
Here’s a quick summary: (1) Draw a flattened oval head, (2) add triangle ears on top, (3) draw light cross guidelines on the face, (4) place two small solid oval eyes on the horizontal line, (5) add a tiny oval nose at the center, (6) draw three whisker lines on each side. Notice that Hello Kitty doesn’t have a visible mouth — that’s intentional! The creator designed her without a mouth so children could imagine their own emotions on her face.